Working with GitHub
- Author:
Jacek Dziedzic, University of Southampton
- Author:
Nicholas Hine, University of Warwick
- Author:
James C. Womack, University of Southampton
- Date:
July 2023
This chapter describes a number of procedures for working with GitHub. These are separate procedures, each performing a simple GitHub-related operation. They are not meant to be invoked in numerical sequence.
Repository location and structure
The ONETEP GitHub repository is located at https://github.com/onetep-devel/.
onetep-devel is the organisation. It contains four repositories (which
you can see by clicking Repositories at the top):
documentation(public) – containing the source of the documentation, for instance this document.
tutorials(public) – containing the source of the ONETEP tutorials.
utils-devel(public) – containing the utilities and resources that are not directly distributed with ONETEP, such as scripts, GFN parameters, vdW parameters, PAW datasets, and developer documentation.
onetep(private) – containing the ONETEP distribution itself, which is mostly Fortran source code (src/), quality-check tests (tests/) and utilities (utils/).
The onetep repository is private, so if you haven’t been granted access to
it, you will only see three repositories at https://github.com/onetep-devel,
and trying to go directly to https://github.com/onetep-devel/onetep will give
you a 404 Page not found.
ONETEP GitHub set-up
Fig. 4 shows how the ONETEP workflow is set up on GitHub and locally, on your drive.
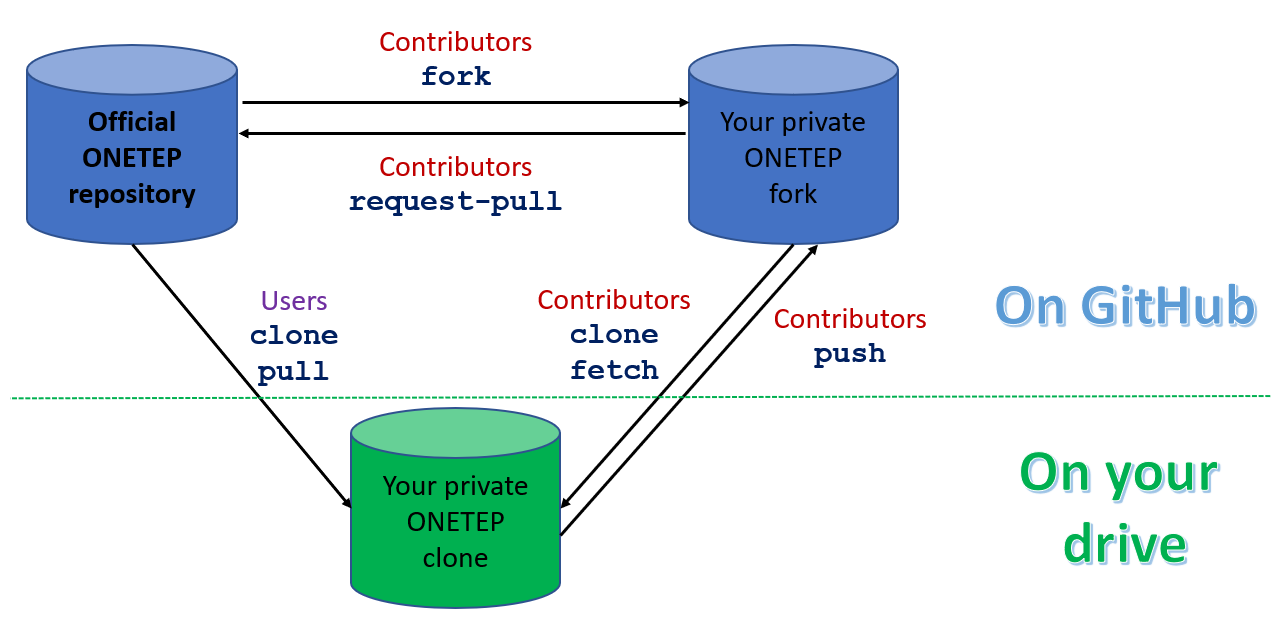
Fig. 4 Set-up of ONETEP on GitHub. There is one official repository. Users clone
the repository (once), and later pull if they want to update it with
the latest changes. They cannot contribute.
Contributors fork the repository first (once),
then clone the fork (once), not the official repository.
They fetch (and merge) from the fork when they want to update. When
they want to contribute changes, Contributors push to their fork first, then
submit a pull request from the fork to the official repository. No pushing
to the official repository happens at any stage. All contributions happen
via pull requests.
Creating a GitHub user account
Go to https://github.com/signup and follow the instructions there. Use your university or organisation email.
Creating a GitHub personal access token (PAT)
To be able to access the ONETEP repository via git, you will need to
create a personal access token or PAT on GitHub. This is a
distinct password from the one you use to access the GitHub web
interface, it will only be used for accessing the repository through
git – the two passwords are not interchangeable. You must have a PAT set up,
you will not be able to access the ONETEP repository with your GitHub password.
For technical details, read https://docs.github.com/en/get-started/getting-started-with-git/about-remote-repositories#cloning-with-https-urls
To create a PAT, on your GitHub page click your profile picture (top right) and
choose Settings from the drop-down list. In the panel on the left, scroll
to the very bottom and click <> Developer settings. On the page that opens,
in the panel on the left choose Personal access tokens and then
Tokens (classic). Click on Generate new token, then
Generate new token (classic). On the page that opens up, put something
descriptive in the Note field, like My personal access token for accessing
ONETEP. Choose an expiration date for your token if you want it to expire
after a certain time, or No expiration if you don’t want it to expire.
Under Select scopes check repo, and nothing else. Click on the green
Generate token button at the bottom. Your PAT has been created. Make sure
to copy it to a safe place at this point – once you leave this page, you
will not be able to retrieve it (just create a new PAT if this happens).
Getting access to the ONETEP repository
The documentation, tutorials and utils-devel repositories are
public – you don’t need any special access, just go to
https://github.com/orgs/onetep-devel/repositories.
To get access to the onetep repository (with the ONETEP source code), you
will need to be granted access. Contact Chris-Kriton Skylaris
(C.Skylaris[-at-]soton.ac.uk) and ask to be added as a member to the
onetep repository. If you do not have a GitHub account yet, make sure to
create one first – follow the instructions at Creating a GitHub user account.
To be able to access the repository via git, you must create a
personal access token on GitHub. Follow the instructions at Creating a GitHub personal access token (PAT)
if you haven’t done that already.
Once your request to join the onetep repository is approved, you will get
a GitHub invitation in your email. In the email message, accept the invitation
by clicking the green button. On the webpage that opens click
Join onetep-devel. You are now a member of the onetep repository.
If you plan to be a ONETEP User (you’d like to use ONETEP and maybe view the source code), follow the steps described in Cloning the official ONETEP repository, then go to Compiling, testing and running ONETEP.
If you plan to be a ONETEP Contributor (you’d like not only to use ONETEP, but also contribute to it), follow the steps described in Forking the official ONETEP repository, then in Cloning your private ONETEP fork, then go to Compiling, testing and running ONETEP.
Cloning the official ONETEP repository
This procedure is only meant for Users. Contributors should go to Forking the official ONETEP repository instead, then to Cloning your private ONETEP fork.
Cloning the ONETEP repository lets you get a copy of the ONETEP distribution, including the source code, the quality-check (QC) tests, and essential scripts. Think of this clone as of your personal copy of ONETEP. This copy will reside locally, on your disk. See also Fig. 4, the left-hand side.
To clone the ONETEP repository, go to your terminal and issue:
git clone https://github.com/onetep-devel/onetep.git
When prompted for username, enter your GitHub username. When prompted for password, type in (or preferably paste) your GitHub personal access token, not your GitHub password.
See Storing GitHub personal access token (PAT) in git for instructions on how to have git store your
credentials so that you don’t have to type or paste them each time you want
to perform an action on your repository.
As a User you don’t have permissions to write to the repository. Attempts to do so will finish with:
remote: Write access to repository not granted.
Cloning the documentation, tutorials or utils-devel repositories
This procedure is only meant for Users. Contributors should go to Forking the documentation, tutorials or utils-devel repositories instead, then to Cloning your private documentation, tutorials or utils-devel fork.
These repositories are public.
Cloning the documentation repository lets you get a copy of the source of
the ONETEP documentation (so, .rst files). If you are just interested in the
compiled documentation (.pdf or .html), you might be better off just
visiting https://onetep.org/resources/documentation.
Cloning the tutorials repository lets you get a copy of the source of
the ONETEP tutorials (so, .rst files). If you are just interested in the
compiled tutorials (.pdf or .html), you might be better off just
visiting https://onetep.org/resources/tutorials.
Cloning the utils-devel repository lets you get a copy of the additional
utilities useful mostly for developers, but ONETEP users may benefit from
having a copy too. ONETEP will offer to clone this repository for you after
you compile it, so perhaps it’s not worth it to clone it manually.
Think of the above clones as of your personal copies of, respectively, the documentation source, the source for the tutorials and the utilities. This copy/copies will reside locally, on your disk. See also Fig. 4, the left-hand side.
To clone the documentation repository, go to your terminal and issue:
git clone https://github.com/onetep-devel/documentation.git
To clone the tutorials repository, go to your terminal and issue:
git clone https://github.com/onetep-devel/tutorials.git
To clone the utils-devel repository, go to your terminal and issue:
git clone https://github.com/onetep-devel/utils-devel.git
When prompted for username, enter your GitHub username. When prompted for password, type in (or preferably paste) your GitHub personal access token, not your GitHub password.
See Storing GitHub personal access token (PAT) in git for instructions on how to have git store your
credentials so that you don’t have to type or paste them each time you want
to perform an action on your repository.
As a User you don’t have permissions to write to the repository. Attempts to do so will finish with:
remote: Write access to repository not granted.
Forking the official ONETEP repository
This procedure is only meant for Contributors. Users should go to Cloning the official ONETEP repository instead.
Forking the ONETEP repository lets you get a copy of the ONETEP distribution, including the source code, the quality-check (QC) tests, and essential scripts. Think of this fork as of your personal copy of ONETEP. This copy will reside on GitHub. You will be able to clone this copy, to get a personal copy of ONETEP locally on your disk. See Fig. 4, the parts marked with Contributors.
To fork the official repository, assuming you have been given access (see Getting access to the ONETEP repository), follow these steps:
Go to
https://github.com/onetep-devel/onetep.Click on
Fork, top right.Choose a repository name for your fork. A good name is
onetep_followed by your initials, e.g. for Jane Doe, you could chooseonetep_jd. The fork will be created in your private workspace, so there’s no need to worry about any conflicts with someone else who has the same initials.Add a description, e.g. Jane’s fork of ONETEP on GitHub.
Uncheck the check-box
copy the master branch only.Click
Create fork.
You now have your private fork, accessible via something like https://github.com/JaneDoe/onetep_jd.
Forking the documentation, tutorials or utils-devel repositories
The procedure is the same as Forking the official ONETEP repository, except onetep should be
replaced with documentation, tutorials or utils-devel.
Cloning your private ONETEP fork
This procedure is only meant for Contributors. Users should go to Cloning the official ONETEP repository instead.
Cloning your ONETEP fork lets you get a local copy of the ONETEP distribution, including the source code, the quality-check (QC) tests, and essential scripts. See also Fig. 4, the left-hand side.
To clone your ONETEP fork, follow these steps:
Go to your GitHub profile – something like https://github.com/JaneDoe, where
JaneDoewould be replaced by your GitHub user name.Click your profile picture (top right) and choose
Your repositoriesfrom the drop-down list.Click the name of your fork that you created earlier, something like
onetep_jd. You are now on the GitHub page of your private fork.Click the green
<> Codebutton.Click the
Copyicon (looks like two overlapping squares) to the right of the address.Go to your terminal, change to a directory where you want your clone to reside, and type
git clone, followed by a space. Paste the address copied earlier. You should get something like:git clone https://github.com/JaneDoe/onetep_jd.gitfor our Jane Doe example.
When prompted for username, enter your GitHub username. When prompted for password, type in (or preferably paste) your GitHub personal access token, not your GitHub password.
You should now have your personal clone.
See Storing GitHub personal access token (PAT) in git for instructions on how to have git store your
credentials so that you don’t have to type or paste them each time you want
to perform an action on your repository.
You are now ready to develop the code inside your private ONETEP fork – see Development within a fork for more details.
As a Contributor you have permissions to write (push) to the repository from your clone. The commits will, of course, wind up in your personal fork. To get them to the official ONETEP repository, follow the steps in Creating a pull request.
Cloning your private documentation, tutorials or utils-devel fork
The procedure is the same as Cloning your private ONETEP fork, except onetep should
be replaced with documentation, tutorials or utils-devel.
Development within a fork
This procedure is only meant for Contributors.
Develop within your local clone on your disk! Any changes to the code should be made in your local clone. Once you are satisfied with them, you can commit them, and push them to your private fork. If you want them to become a part of official ONETEP, you should then create a pull request from your private fork to the official repository. Here’s how to do that: Creating a pull request.
Whether you are a Contributor or a User, you might want to update your repository with any latest changes that might have occurred in the official repository. Users might be interested in recent bug fixes or new functionality, Contributors will want to update their copy before committing any changes of their own. Keep your fork up-to-date with changes in the official repository by regularly merging with the official repository, i.e.
Add the official repository as a remote to your local repository (only once):
git remote add github_official https://github.com/onetep-devel/onetep.git
If you are developing documentation, tutorials or the utilities, replace
onetepwithdocumentation,tutorialsorutils-develin the above.Fetch changes from the official repository (each time):
git fetch github_official
Merge changes from the official repository into your currently checked-out branch (each time):
git merge github_official/master
It is often the case that make cleanall must be issued after merging,
the script for cascade avoidance used when making ONETEP can get confused
as to what needs to be rebuilt after a git merge.
Remember to commit your changes regularly and push these to your fork on
GitHub so that they are backed up, e.g. git push origin <branch_name>
where <branch_name> is the name of the git branch you are working on.
You can choose how you develop in your private fork as the branches, tags etc. that you create in the fork do not affect the official repository.
You can apply bugfixes to release branches in your private fork, too, i.e.
Fetch changes from the official repository:
git fetch github_official
Check out a release branch:
git checkout academic_release_v5.0
Commit your bugfix to the branch and push to your changes back to GitHub.
The above text describes a basic git workflow within a private fork.
If you are not familiar with git, or source code version control in general,
it may be worthwhile to spend some time working through a tutorial or guide
before proceeding with any serious ONETEP development. There are numerous
resources available online. Here is a small selection:
[Official Git (git-scm.com) documentation](https://git-scm.com/doc)
[Software carpentry: “Version control with Git”](https://swcarpentry.github.io/git-novice/)
More experienced git users may prefer to use a different process.
You may use whatever workflow you like in your own private fork, since your
changes will be selectively applied to the official repository via the pull
request process.
Keeping the XML file up to date
This procedure is only meant for Contributors.
ONETEP uses an XML log file to store information about the internal state of the
calculation in an easier to parse way. Currently this is only used in a limited way,
to assist with determining whether a ONETEP calculation can be restarted or continued,
as described in Restarting or continuing ONETEP runs. A major part of the XML file is used to store
the values of the variables which are declared at the top of rundat_mod.F90. This
information was previously invisible during the calculation unless specific write
statements were present or added to the code. In order to systematise this and to make it
easier to handle the long list of variables declared in rundat_mod.F90, a new module
called rundat_new_mod.F90 was introduced in which those variables are part of a derived
data type, and auxiliary subroutines are available to interact with it. The XML I/O is
mostly handled by rundat_xml_mod.F90. These two files are very long and are actually
auto-generated, so that the developer should never modify them directly (with a small
exception mentioned later in point 4).
The rundat_new_mod.F90 and the rundat_xml_mod.F90 files are auto-generated by a
small program included in the rundat_new folder (top level with respect to the ONETEP
source distribution). If new variables are added to rundat_mod.F90 or changes are made
to existing variables, the auto-generated code also needs to be updated. To do so, the
following steps should be followed:
Ensure that all variables declared in
rundat_mod.F90have matching declarations in the filerundat_vars.F90within the folderrundat_new. If some are missing or need correcting the developer has to do this by hand. Point 3 can help with this.Auto-generate the
rundat_new_mod.F90and therundat_xml_mod.F90files by running themake_rundat_new.shscript also given in therundat_newfolder.make_rundat_new.shis currently very primitive; ifgfortranis not available as a compiler this has to be manually corrected in the script.The
make_rundat_new.shscript also generates a comparison table between the variables listed inrundat_mod.F90and inrundat_vars.F90. The table is in the fileparse_outin therundat_newfolder. This can be useful to figure out which variables might be missing fromrundat_vars.F90or if some changes have been made to them.Check if the
rundat_new_mod.F90and therundat_xml_mod.F90files comply with the ONETEP coding standards with respect to maximum code line lenghts. If not, the offending lines require manual editing to insert line breaks (this will be fixed/automated in the near future).
At present there is no significant consequence if the variables in the XML file are
not up to date with the ones declared in rundat_mod.F90, unless they are needed for
checkpointing/restarting/continuing ONETEP runs. In any case, it is recommended to follow
the steps explained in the previous paragraph to keep everything up to date and consistent.
Creating a pull request
This procedure is only meant for Contributors.
When your changes are ready for contributing to the official ONETEP repository, you need to create a pull request via the GitHub web interface.
- Before you make your pull request:
Make sure that your changes satisfy the code quality requirements (see Advice for Contributors), or your pull request will be rejected.
Make sure that your code is up-to-date with official ONETEP repository – use the instructions in Development within a fork to merge changes into the branch you are working on in your fork.
Once you are sure your code satisfies the requirements and is synchronized with the official repository, follow these steps.
Open the GitHub project page for your private fork in a web browser. This will be something like https://github.com/JaneDoe/onetep_jd.
Click
Contributebelow and to the left of the green<> Codebutton.Click
Open pull request.Edit the title and description of what you want to commit.
Choose Reviewer(s) on the right. Read the two notes below.
Click
Create pull request.
Your pull request has now been created. You should wait for the Reviewer(s).
If they have issues with your proposed changes, they will let you know and maybe suggest how to fix them. There is no need to create a new pull request in that case. You can apply the requested changes directly to the branch in your private fork for which the pull request was issued and they will be automatically added your pull request.
If they have no objections to your pull request, you should get a notification that it has been merged. The merging is done by the Reviewer.
Note
It looks like at our settings it is not possible to have more than one reviewer, unless we upgrade to Pro, Team or Enterprise plan, see: https://github.com/orgs/community/discussions/23978
Note
Also, unless you are one of the repository Owners, you will simply not see
the option to select a Reviewer. This is a GitHub feature meant to prevent
any spamming from people who forked public repositories. Intead of adding a
Reviewer, tag the person or people you’d like to review your change in the
text that you enter in the Leave a comment box. For instance, type
@JacekDziedzic to add Jacek as a reviewer – he will then get a notification
once you submit the pull request.
If the pull request is for the documentation or tutorials, once it is merged,
the changes will be deployed automatically to the ONETEP website
(a documentation-deploy or tutorials-deploy GitHub Action). When
the pull request is submitted, this step will be skipped (because you have not
been authorised to make the changes at this point yet). It will only be run
following the merge.
Reviewing and merging pull requests
This procedure is only meant for Reviewers on pull requests.
To review and merge a pull request on which you are a Reviewer, follow these steps.
Go to the ONETEP official repository, https://github.com/onetep-devel/onetep.
Click
Pull requestsat the top.Locate the pull request in question and click on it.
If you have comments, you can type them in the
Leave a commenttext field and clickComment.To finish the review, click the green button
Add your reviewat the top right.If you would like to reject this pull request, click
Close pull requestat the bottom. This will close the pull request. You can later reopen it.If you would like to merge this commit, click the arrow near the green button (the button caption may vary, e.g.
Merge pull requestorSquash and merge), and chooseSquash and merge.Click
Squash and merge.Click
Confirm squash and merge.
Simple changes to documentation or tutorials
If you have a small change to the documentation or tutorials, for instance you
want to add or change a single file or several files, and you’re an Owner,
you can just upload the new/updated files straight from the GUI. Make sure
you are logged in, then choose Add File (to the left of the green button).
Follow the instructions on screen. Once you’re done, this will create a commit.
Storing GitHub personal access token (PAT) in git
It’s likely that you will soon find typing or pasting the GitHub personal access token any time you want to perform an operation on your repository cumbersome. To avoid having to do this, go to your local repository clone and, from the command line, issue the following command:
git config credential.helper store
The next time you are prompted for a password will be the last time –
git will store it for you.
Adding a new user to the repository
This section is meant for Owners. It explains how to add users to the ONETEP GitHub repository.
Note that only the onetep repository is private. Anyone can access the
public repositories of the organisation onetep-devel (which are
documentation, tutorials and utils-defvel). To add a user to
the onetep repository, you yourself must be a user in the Owner role.
To add a new user, follow these steps:
Go to the organisation level: https://github.com/onetep-devel.
Choose
Peopleat the top, thenInvite member.Type in the invitee’s GitHub username or email address, click
Invite.Choose a suitable
Role. To add a typical user, just leaveMemberselected. To add a privileged user, switch toOwner. ClickSend Invitation.The invitee should now appear in the
Invitationspane on the left.That’s it. Once the invitee accepts the invitation, they will be visible in the
Peoplemenu.